Introduction
Dutch oven bread recipes bring bakery style bread into a home kitchen with almost no effort. A heavy pot with a tight lid traps steam just like a professional bread oven. The result is a loaf with a deep golden crust and a tender open crumb that feels like it came from an artisan bakery. Home cooks in the United States and across Europe have fallen in love with dutch oven bread recipes because the method is simple and the results are consistently impressive.
The idea of baking bread inside a covered pot is not new. Traditional European kitchens often relied on heavy iron pots to bake rustic loaves in fireplaces or simple ovens. Modern dutch ovens made of cast iron or enameled cast iron use the same idea and make it easier to create steam and stable heat. Over the past years no knead dutch oven bread recipes have appeared on many food blogs and social media feeds as more people discover that they can bake beautiful bread with just a bowl a spoon and a pot.
Many bakers have their own story about the first time they tried dutch oven bread recipes. Often it begins with a cool weekend afternoon and the desire to fill the house with the smell of fresh bread. After a few minutes of stirring flour water yeast and salt the dough rests while you go about your day. Later that evening you heat the dutch oven drop in the risen dough and wait for the lid to reveal a crusty golden loaf. It becomes a regular ritual for cozy dinners homemade soups and special breakfasts.
In this guide you will find a complete western style method for dutch oven bread recipes that is friendly for beginners and satisfying for more experienced bakers. You will learn how to choose quality ingredients mix and rest the dough shape the loaf and bake it for maximum crust and flavor. You will also see healthy substitutions tips for different diets troubleshooting advice and practical answers to common questions.
dutch oven bread recipes easy and delicious step by step method
Equipment
- Large mixing bowl
- Wooden spoon or sturdy spatula
- Measuring cups and spoons or kitchen scale
- Plastic wrap or clean kitchen towel for covering the bowl
- Parchment paper
- Sharp knife or bread scoring blade
- Dutch oven with lid made from cast iron or enameled cast iron
- Oven mitts
- Wire cooling rack
Ingredients
- Three and one half cups bread flour around four hundred fifty grams
- One and one half cups warm water around three hundred sixty milliliters
- One teaspoon instant or active dry yeast
- Two teaspoons fine sea salt
- One teaspoon sugar or liquid honey optional for gentle sweetness and browning
- One tablespoon olive oil optional for a softer crumb and richer flavor
- Up to one cup whole wheat flour replacing the same amount of bread flour for more fiber and a nutty taste
- One to two teaspoons dried herbs such as rosemary thyme or mixed Italian style seasoning
- One half cup grated cheese such as cheddar or parmesan for a savory loaf
- Two tablespoons mixed seeds such as sesame sunflower and poppy for a seeded crust
Instructions
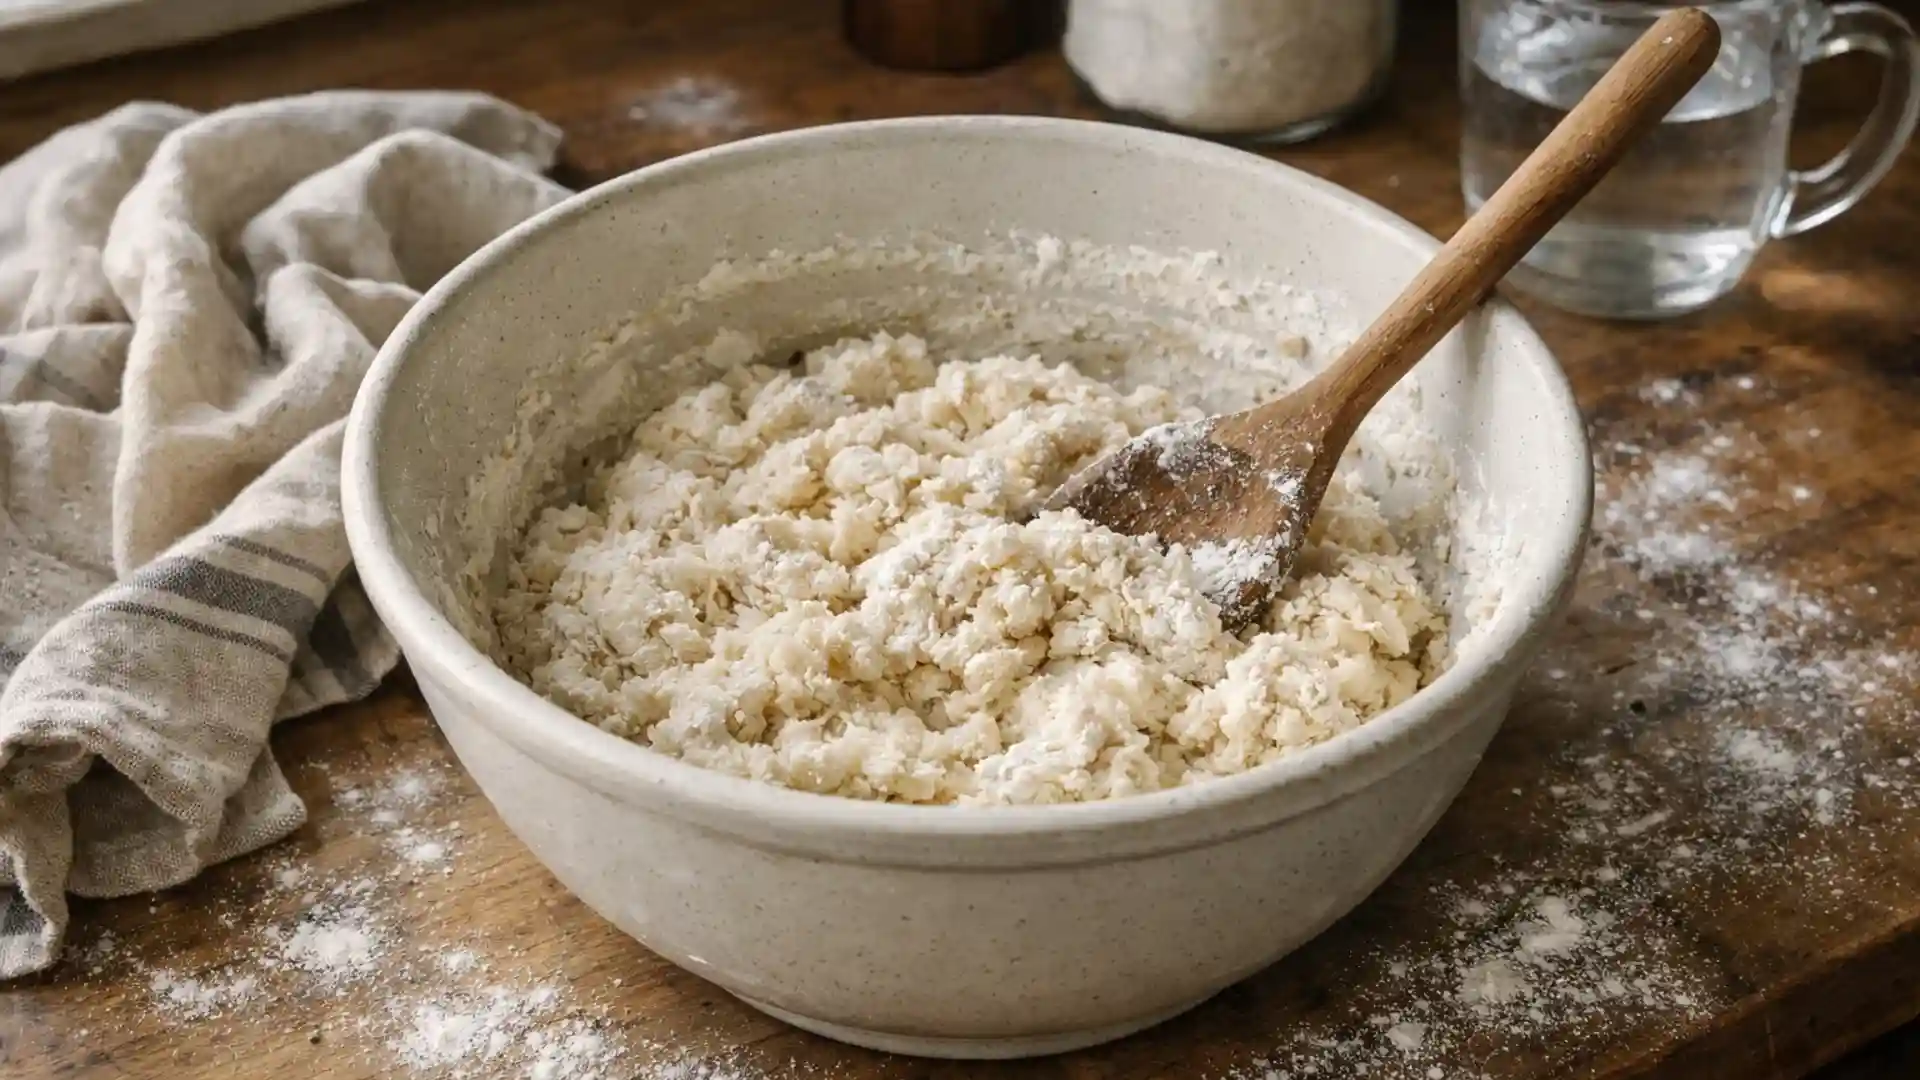
- In a large mixing bowl combine the bread flour yeast and salt then stir until the dry ingredients are evenly mixed
- Add the warm water along with the sugar or honey and the olive oil if you are using them then stir with a wooden spoon until all of the flour is moistened and a shaggy sticky dough forms
- Scrape down the sides of the bowl so the dough gathers in the center then cover the bowl tightly with plastic wrap or a clean kitchen towel
- Let the dough rest at room temperature for eight to twelve hours until it has risen noticeably and the surface shows many small bubbles. Many bakers prefer to mix the dough in the evening and let it rise overnight
- Once the dough has risen generously dust your work surface lightly with flour. Use a spatula or scraper to gently ease the dough out of the bowl onto the floured surface trying not to knock out all of the air
- Sprinkle a little flour over the top of the dough and on your hands. Gently fold the edges of the dough toward the center several times to form a loose ball. Turn the dough so the smoother side faces up
- Shape the dough into a tight round loaf by cupping your hands around it and turning it while tucking the bottom edges under. This creates surface tension on the top which helps the loaf rise high in the oven
- Place the shaped dough seam side down on a piece of parchment paper large enough to hold the loaf and to lift it easily. Cover it loosely with a towel and let it rest for about thirty to sixty minutes until slightly puffy
- While the dough rests place your empty dutch oven with its lid in the main oven. Preheat the oven to about four hundred fifty degrees Fahrenheit which is roughly two hundred thirty degrees Celsius and allow at least thirty minutes so the pot heats fully
- When the oven and dutch oven are hot carefully remove the pot using thick oven mitts and set it on a heat safe surface
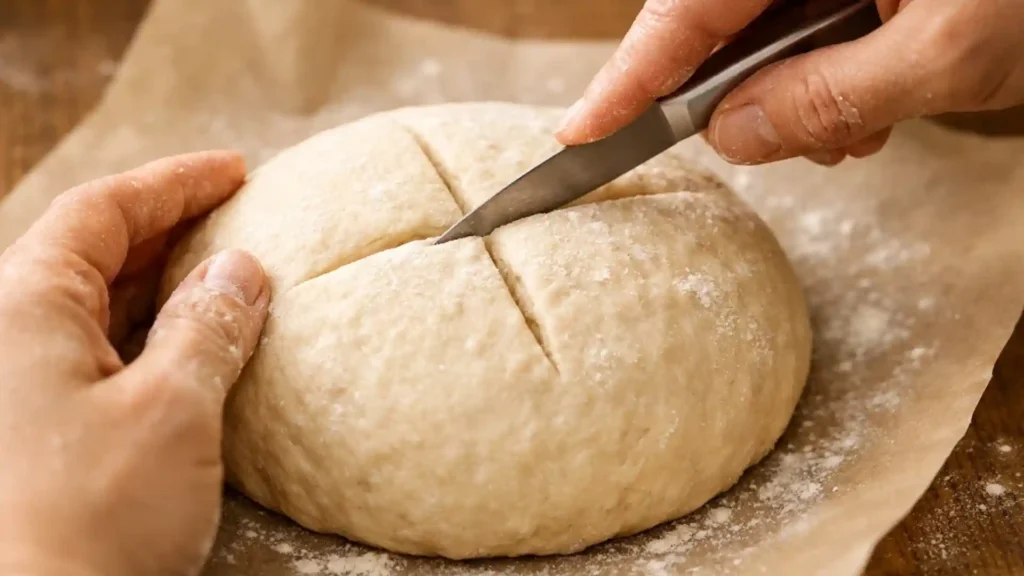
- Use a sharp knife or bread scoring blade to make one long slash or a simple cross on the top of the dough. This scoring helps control how the loaf expands as it bakes
- Lift the dough by the edges of the parchment paper and lower it gently into the hot dutch oven. The parchment should stay under the loaf
- Cover the dutch oven with the lid and place it back into the hot oven. Bake covered for about twenty to twenty five minutes. During this time the enclosed steam helps the bread rise and creates a crisp crust
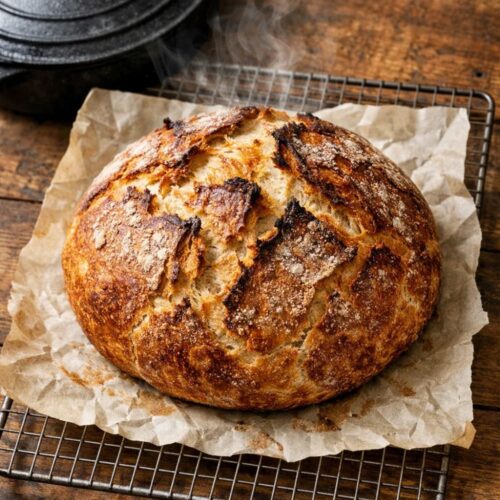
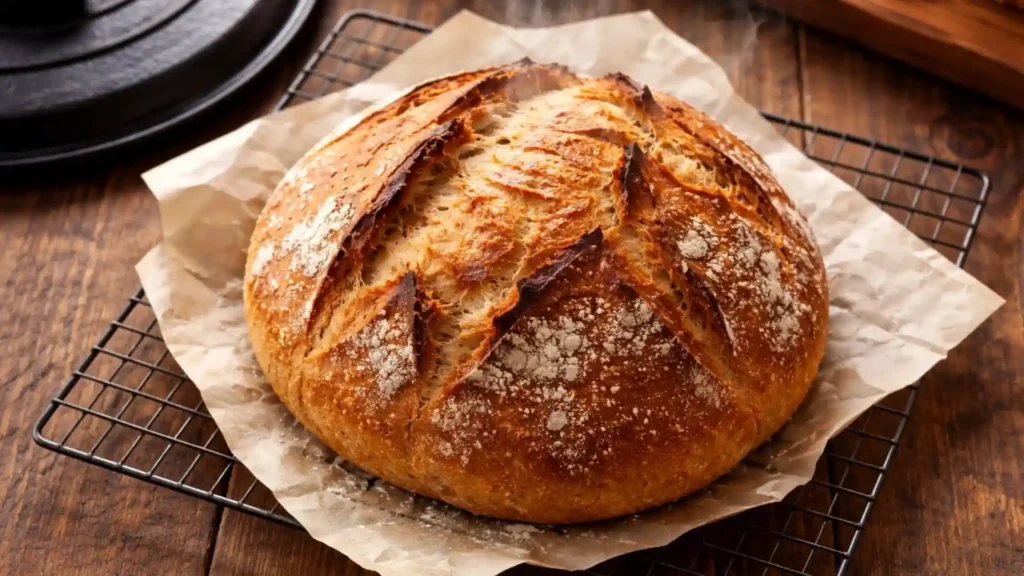
- After the covered baking time carefully remove the lid and continue baking the loaf uncovered for about fifteen to twenty minutes until the crust is a deep golden brown and feels firm
- When the bread looks done lift the dutch oven out of the oven using oven mitts. Grasp the parchment paper and move the loaf onto a wire rack. Let the bread cool completely for at least one hour so the crumb sets fully
- Slice the cooled loaf with a serrated bread knife. Serve plain or with butter olive oil and herbs or alongside soup and salad. Store leftovers at room temperature for one to two days or freeze slices for longer storage
Notes
Ingredients for dutch oven bread recipes with healthy substitutions
The classic no knead loaf for dutch oven bread recipes uses only a few pantry ingredients. Simple choices and good quality make a big difference in flavor and texture. The list below is for one medium round loaf that serves about eight slices.
Main dough ingredients
- Bread flour about three and one half cups which is close to four hundred fifty grams
- Warm water about one and one half cups which is close to three hundred sixty milliliters
- Instant or active dry yeast about one teaspoon
- Fine sea salt about two teaspoons
- Optional sugar or honey about one teaspoon for gentle sweetness and better browning
- Optional olive oil about one tablespoon for a slightly softer crumb
Healthy and alternative options
- Part whole wheat version
Replace up to one cup of bread flour with whole wheat flour. This increases fiber and gives dutch oven bread recipes a nutty flavor and darker color. For the best rise keep at least two thirds of the total flour as white bread flour. - Fully whole grain attempt
For a denser rustic loaf you can use half bread flour and half whole wheat or spelt flour. Increase the water by a few tablespoons because whole grains absorb more liquid. Expect a tighter crumb and a very hearty taste. - Vegan friendly choice
Most dutch oven bread recipes are naturally vegan. Use olive oil instead of butter and avoid brushing the loaf with dairy based washes. The basic ingredients flour water yeast and salt are plant based. - Gluten friendly variation
Classic dutch oven bread recipes depend on gluten for structure. For a gluten free attempt choose a commercial gluten free bread flour blend that includes binders such as psyllium husk or xanthan gum. Begin with slightly less water than the original recipe involve more careful mixing and expect a different but still enjoyable texture.
Tips for selecting quality ingredients
Choose bread flour from a reliable brand with medium to high protein content. This helps form strong gluten strands that allow dutch oven bread recipes to rise high and hold an airy crumb. Use fresh yeast that has not passed its preferred date and store it properly in a cool dry place. For salt pick a fine sea salt or kosher style salt so it dissolves quickly in the dough. If your tap water has a strong chlorine scent consider using filtered water to support steady yeast activity and better flavor.
Step by step method for dutch oven bread recipes
This method focuses on a classic no knead style dough baked in a preheated dutch oven. The total time includes a long rest for fermentation which creates excellent flavor with very little active work.
1 Mixing the dough
- In a large mixing bowl combine the bread flour yeast and salt. Stir briefly so the yeast and salt spread through the flour.
- Pour in the warm water and add the optional sugar or honey and olive oil if you choose to use them. The water should feel slightly warm to the touch but not hot.
- Use a wooden spoon or your hand to mix until all of the flour is moistened and there are no dry pockets. The dough will look shaggy and sticky. This is expected for no knead dutch oven bread recipes.
- Scrape down the sides of the bowl so the dough gathers in the center. Cover the bowl with a lid or clean cloth.
2 First rise and fermentation
- Let the dough rest at room temperature for at least eight to twelve hours. Many bakers mix the dough in the evening and let it rise overnight.
- During this time the yeast will slowly produce gas and flavor building a soft and bubbly dough. By the end the surface should show scattered bubbles and the dough should have increased in volume.
- If your kitchen is cool the dough may need closer to twelve hours. In a warm kitchen eight to ten hours may be enough. Great dutch oven bread recipes rely more on visual cues than on a strict clock so trust your eyes.
3 Shaping the loaf
- Lightly flour your work surface. Use a spatula or scraper to gently ease the dough from the bowl onto the floured surface. Try not to press out all of the gas.
- Flour your hands and fold the edges of the dough toward the center several times to create a rough ball. The dough will still feel soft and sticky but should start to hold a round shape.
- Turn the dough seam side down. With floured hands gently rotate and tuck the edges under to create a tight smooth ball. Surface tension helps dutch oven bread recipes rise upward instead of spreading out.
- Place the shaped ball seam side down on a piece of parchment paper large enough to hold the loaf and lift it easily. Cover it loosely with a cloth.
4 Second rise
- Let the shaped dough rest for thirty to sixty minutes while you preheat the oven and dutch oven.
- The loaf should puff up slightly and feel lighter when you touch it gently. If it flattens quickly it may have over proofed. Shorten this stage next time if that happens.
5 Preheating the dutch oven
- Place your empty dutch oven with its lid inside your main oven.
- Heat the oven to about two hundred thirty degrees Celsius which equals about four hundred fifty degrees Fahrenheit. Allow at least thirty minutes so the pot becomes fully hot.
- Preheating is essential for many dutch oven bread recipes because it ensures strong oven spring and a well browned crust.
6 Transferring and scoring the dough
- Carefully remove the hot dutch oven from the oven using thick oven mitts. Set it on a heat safe surface.
- Lift the dough gently by the edges of the parchment paper and lower it into the hot pot. The parchment will stay under the loaf and helps prevent sticking.
- Use a very sharp knife or bread blade to make a few quick slashes across the top of the dough. A simple cross or single long slash works well. This scoring allows steam to escape and guides the expansion of the loaf.
7 Baking
- Cover the dutch oven with its lid and place it back into the hot oven.
- Bake covered for about twenty to twenty five minutes. The trapped steam helps create a glossy crisp crust.
- After this time carefully remove the lid. Continue baking the bread uncovered for another fifteen to twenty minutes until the crust is deep golden brown.
- If you prefer a lighter crust shorten the uncovered time by a few minutes. For a darker thicker crust allow a few extra minutes but watch closely to avoid burning.
8 Cooling
- Use oven mitts to lift the dutch oven out of the oven. Grasp the parchment paper and lift the loaf from the pot onto a wire rack.
- Let the bread cool completely for at least one hour before slicing. This resting time allows the interior to finish setting so slices stay tender and neat rather than gummy.
- Once cooled slice with a serrated bread knife and enjoy plain or with butter soups salads or simple spreads.
Tips and variations for dutch oven bread recipes
The basic method is only the beginning. With a few changes you can create many flavors and adjust dutch oven bread recipes to fit different diets and occasions.
1 Flavor variations
- Herb and garlic bread
Add one to two teaspoons of dried herbs such as rosemary thyme oregano or an Italian style blend to the dry flour before mixing. You can also add one teaspoon of garlic powder or a small amount of finely minced roasted garlic during mixing. These additions make excellent bread for pasta dishes or roasted meats. - Cheese bread
Fold in a half cup of grated cheese such as cheddar or parmesan during the last stages of mixing. The cheese will melt into the loaf creating pockets of savory flavor. Cheese rich dutch oven bread recipes are wonderful alongside soups and tomato based meals. - Seeded crust bread
Before the second rise gently press the shaped dough into a plate of mixed seeds such as sesame poppy and sunflower. Place the dough seed side up on parchment. The seeds toast in the hot oven adding crunch and nutrition. - Olive and herb loaf
For a Mediterranean style twist mix in chopped olives and fresh herbs. Reduce the water slightly to account for the moisture in the olives. This variation pairs well with salads grilled vegetables and cheese plates.
2 Adapting to different eating patterns
- Vegan friendly approach
As mentioned most dutch oven bread recipes are already vegan. Confirm that your sugar is made in a vegan friendly way if that is important to you or replace it with maple syrup or simply omit it. Brush the crust with olive oil for extra color and flavor instead of butter. - Lower sodium version
You can reduce the salt by about one third for a mild lower sodium loaf. To keep flavor interesting add herbs garlic or citrus zest to the dough. Remember that salt also affects texture so avoid removing it completely. - Higher fiber loaf
Replace some of the white bread flour with whole wheat or other whole grain flour. Add a spoon of flax meal or chia seeds to the dough for extra fiber. These changes make dutch oven bread recipes more filling and nutritious though the texture will be slightly denser.
3 Attractive serving suggestions
- Serve thick warm slices in a bread basket lined with a cloth.
- Toast leftover slices and top them with avocado roasted vegetables or scrambled eggs for breakfast.
- Use the loaf as a base for rustic sandwiches filled with grilled chicken roasted peppers or fresh cheese and herbs.
- Pair the bread with comforting soups and stews. Dutch oven bread recipes create loaves that are ideal for dipping into tomato soup creamy potato soup or hearty chili.
- For your food blog share photos that highlight the crust and crumb. For example an overhead view of a sliced loaf on a wooden board or a close focus shot of the airy interior. These images can use alt text such as crusty dutch oven bread loaf on a cutting board or easy dutch oven bread recipes served with soup.
Nutrition information for dutch oven bread recipes
Exact nutrition values depend on flour brand additions such as cheese or seeds and slice size. The values below describe one slice from a medium loaf made with white bread flour and a small amount of oil. This loaf yields about eight slices.
Approximate nutrition per slice
- Calories around one hundred eighty
- Carbohydrates around thirty six grams
- Protein around six grams
- Total fat around two to three grams mainly from olive oil
- Fiber around one to two grams
- Sodium around two hundred to two hundred fifty milligrams with the standard salt amount
Adding whole grains seeds nuts or cheese will increase calories fat fiber and sometimes protein. Serving dutch oven bread recipes alongside vegetable rich soups salads and lean proteins helps create a balanced meal.
Common problems and solutions in dutch oven bread recipes
Even simple dutch oven bread recipes can present challenges from time to time. Here are some frequent issues and ways to fix them.
Dense or heavy crumb
If your bread feels heavy and the interior looks tight rather than open the dough may have needed more time to rise or the water level may have been too low. Next time allow the first rise to continue until the dough clearly increases in volume and shows bubbles on the surface. You can also add a little more water to create a softer wetter dough which usually leads to a more open crumb.
Flat loaf that spreads instead of rising tall
A flat loaf often means the dough was too wet or not shaped tightly enough. When shaping use flour on your hands and the counter then create strong surface tension by tucking and rotating the dough into a smooth ball. If the dough feels very loose reduce the water slightly the next time you make dutch oven bread recipes.
Crust too pale
If your crust remains pale even after full baking increase the uncovered baking time by a few minutes. You can also raise the oven temperature slightly as long as the bottom of the loaf does not burn. Some bakers lightly brush the surface with oil before baking to encourage deeper color.
Crust too hard
A very thick tough crust can result from baking too long or at too high a temperature. Shorten the baking time by a few minutes or lower the oven temperature a bit. Let the loaf cool fully then store it in a bag or covered container which softens the crust slightly.
Bread sticks to the dutch oven
To prevent sticking always use parchment paper under your loaf. If you do not have parchment sprinkle the bottom of the pot with coarse cornmeal or flour before adding the dough. Make sure the pot is very hot before the dough goes in because quick heat helps set the outer layer and reduces sticking.
Gummy center
A gummy interior usually means the bread was under baked or sliced too soon. Bake until the loaf feels quite firm and sounds hollow when tapped on the bottom. Let the bread cool for at least one hour before cutting. Patience is essential for perfect dutch oven bread recipes.
Frequently asked points about dutch oven bread recipes
Replacing flours in dutch oven bread recipes
You can use all purpose flour in place of bread flour though the texture may be slightly softer and less chewy. When using all purpose flour begin with a little less water because this flour sometimes absorbs less liquid. If the dough feels dry you can add more water a spoon at a time.
Making dutch oven bread recipes ahead of time
You can easily fit this bread into your schedule. Mix the dough and allow the first rise at room temperature for a few hours then place the covered bowl in the refrigerator for up to twenty four hours. When you are ready to bake let the dough warm up at room temperature for about one hour shape it and continue with the method. Longer cold fermentation creates more complex flavor.
Using different sizes of dutch oven
Most dutch oven bread recipes work well in round pots that hold around four to six liters. A pot that is too large can make the loaf spread out so if your pot is big you can increase the dough amount or shape it more tightly. For smaller pots reduce the recipe quantities slightly so the loaf has room to expand.
Baking without parchment paper
If you do not have parchment carefully oil the inside of the pot and dust it with flour or cornmeal. This method is less reliable than parchment but can work in a pinch. Be gentle when removing the baked loaf so you do not tear the crust.
Storing and freezing dutch oven bread
After the bread cools completely store it at room temperature wrapped in a clean cloth or in a bread box. Avoid sealing it tightly in plastic on the first day as this can make the crust rubbery. For longer storage slice the loaf and freeze the slices in a bag. Toast directly from frozen when needed. Dutch oven bread recipes freeze well and keep good flavor for up to one month.
Serving suggestions for leftover bread
Toast slices and top them with nut butters jam or honey for a quick breakfast. Cube leftover bread and turn it into croutons for salads and soups or use it in bread pudding. These ideas help you enjoy every part of your loaf and reduce waste.
Conclusion and invitation to interact
Dutch oven bread recipes open the door to bakery quality bread in almost any home kitchen. With a sturdy pot a little yeast and some patient resting time you can produce loaves that are crusty on the outside and soft inside. The method in this guide uses simple tools and clear steps so even a first time baker can succeed. Once you are comfortable with the basic recipe you can experiment with herbs cheese seeds and whole grains to create your own signature versions.
If you share this recipe on your food blog encourage readers to try baking their first loaf this week and to return with comments and ratings. Ask them to describe which flour they used how long they let the dough rest and how they served the bread. Honest feedback helps refine future batches and builds a sense of community around your dutch oven bread recipes.
You can also guide readers toward related content on your site. Suggest that they explore your sourdough bread bowls recipe or your collection of easy soup recipes that pair perfectly with fresh bread. Over time this network of helpful recipes and friendly guidance will turn your blog into a trusted destination for anyone who loves home baked bread and comforting meals.
sourdough bread bowls easy and delicious step by step method