2. Introduction
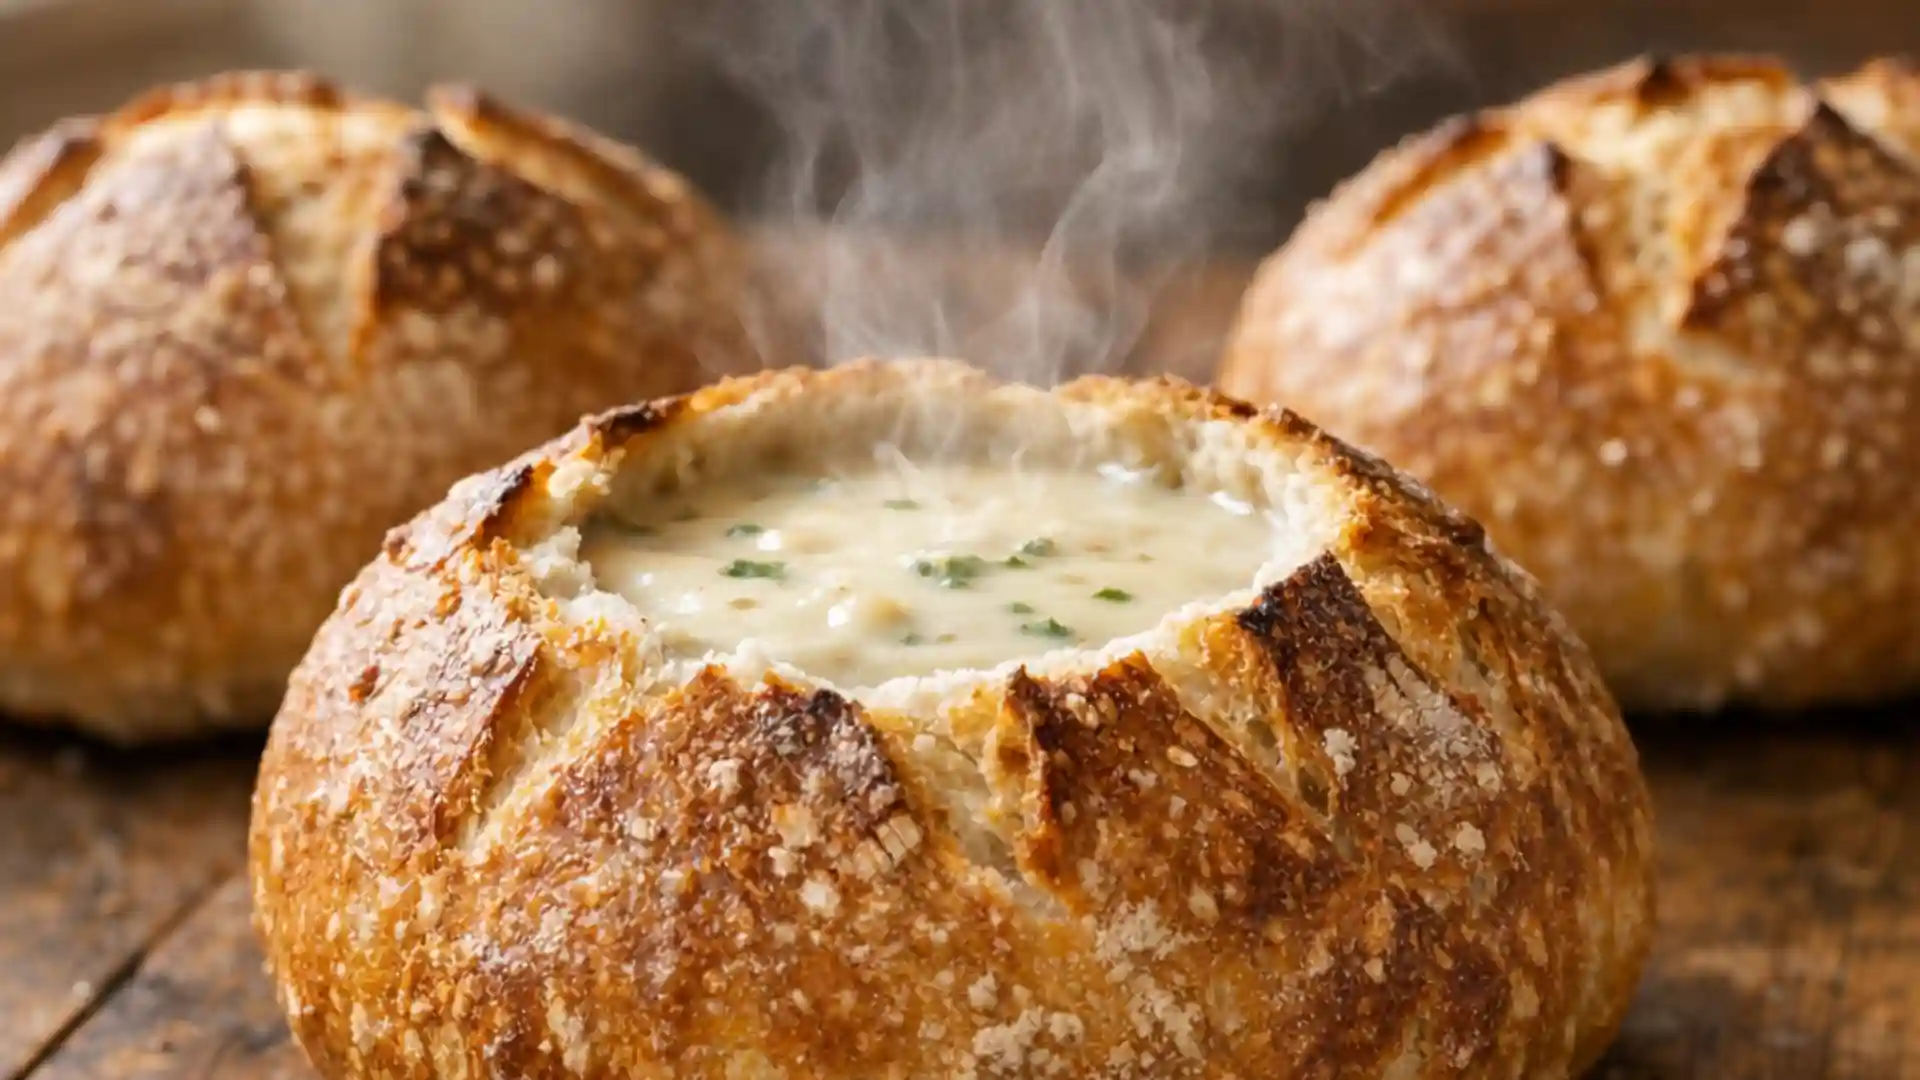
Sourdough bread bowls bring together two comforting ideas at once warm handmade bread and a generous serving of soup or stew. The idea of serving soup inside bread has roots in European country kitchens where hearty loaves were used as plates during cold seasons. Over time bakers in the United States and Europe began shaping smaller round loaves with thicker crusts that could hold creamy chowder chili or broccoli cheddar soup without falling apart. Today sourdough bread bowls are a favorite sight in American cafes and bakery restaurants especially during fall and winter.
The charm of sourdough bread bowls comes from both flavor and experience. The naturally fermented dough has a gentle tang and deep wheaty aroma that feels richer than regular yeast bread. When you break into a freshly baked bowl you first hear the crackle of the crust then reach soft chewy crumb that soaks up hot soup. It turns an ordinary lunch into a cozy ritual. Many people associate sourdough bread bowls with weekend family gatherings game days or special nights in when the weather is cold and everyone wants something filling and nostalgic.
For home bakers sourdough bread bowls are also a fun way to show off what a healthy lively sourdough starter can do. Once you learn the basic method the process is surprisingly relaxing. Mix simple ingredients flour water salt and starter then give the dough time to rise and develop flavor. Shape individual rounds score the tops and bake until golden. With a little planning you can prepare the dough in the evening and enjoy freshly baked sourdough bread bowls the next day filled with your favorite soup.
In this guide you will learn a complete step by step method to make sourdough bread bowls in a western style that suits American and European tastes. The recipe focuses on an easy schedule clear instructions and flexible options for different diets so you can create bread bowls that look impressive yet fit your everyday kitchen routine.
sourdough bread bowls easy and delicious step by step method
Equipment
- Large mixing bowl
- Kitchen scale or measuring cups and spoons
- Dough scraper or bench scraper
- Clean kitchen towel or plastic cover
- Baking sheet
- Parchment paper or silicone baking mat
- Sharp knife or bread lame for scoring
- Wire cooling rack
- Oven
Ingredients
- four cups bread flour about five hundred grams
- one cup active sourdough starter about two hundred grams at room temperature
- two cups warm water about four hundred eighty milliliters
- two and one half teaspoons fine sea salt about twelve grams
- one tablespoon olive oil optional for a softer crust
- one tablespoon honey or sugar optional for gentle sweetness and browning
- up to one cup whole wheat flour replacing the same amount of bread flour
- one to two teaspoons dried herbs such as rosemary thyme or Italian style blend
- one small handful grated hard cheese optional
- one teaspoon garlic powder or roasted minced garlic optional
Instructions
- Feed your sourdough starter several hours before you plan to mix the dough so that it becomes bubbly doubles in volume and smells pleasantly tangy
- In a large mixing bowl stir the warm water and active sourdough starter together until the starter is mostly dissolved
- Add the bread flour to the bowl and mix with your hand or a sturdy spoon until no dry patches of flour remain. The dough will look rough and shaggy. Cover the bowl and let it rest for about thirty minutes
- After the rest sprinkle the salt over the dough. Add the olive oil and honey or sugar if you are using them. With a slightly wet hand pinch and fold the dough until the salt and other ingredients are well mixed. The dough should start to feel smoother
- Begin the first part of bulk fermentation. Over the next two hours complete three or four sets of stretch and folds about thirty minutes apart. To do this slide your hand under one side of the dough lift it up and fold it over the center. Turn the bowl and repeat from the other sides until you have folded the dough all around
- After the last set of folds cover the bowl and let the dough rise at room temperature until it increases in volume by about half to three quarters. Depending on your kitchen this usually takes another one to three hours. The dough should look puffed with small bubbles around the edges and feel airy when you gently lift the bowl
- Lightly flour your work surface. Turn the dough out gently so that you do not deflate it completely. Use a dough scraper or knife to divide the dough into four equal pieces
- Shape each piece into a loose round by tucking the edges under. Let these rounds rest on the counter for about twenty minutes. This rest makes the dough easier to shape tightly later
- For final shaping flip one round so the smooth side is down. Gently stretch one edge up and over toward the center and repeat from several directions to create surface tension. Flip the dough so the smooth side faces up and use your hands to drag it toward you in small motions so the top becomes tight and round. Repeat with the remaining pieces
- Place the shaped rounds on a parchment lined baking sheet leaving space between each one. Cover them lightly with a kitchen towel and let them proof at room temperature until puffy and lighter. This final rise usually takes one to two hours. The dough should slowly spring back when pressed lightly with a fingertip
- Alternatively for more flavor and flexible timing cover the shaped dough and refrigerate it for eight to twelve hours. You can bake the sourdough bread bowls directly from the refrigerator
- About forty minutes before baking preheat your oven to about four hundred fifty degrees Fahrenheit or about two hundred thirty degrees Celsius. If you have a baking stone or steel place it on the middle rack. You can also place a sturdy empty pan on a lower rack to create steam later
- When the oven is hot uncover the dough. If you like you can brush the tops lightly with olive oil or plant based milk for a gentle shine. Use a very sharp knife or bread lame to score each round with a simple cross pattern on top. This helps the bread expand evenly in the oven
- Place the baking sheet on the hot stone or rack. For extra steam carefully pour a cup of hot water into the empty pan on the lower rack and close the oven door quickly
- Bake the sourdough bread bowls for about twenty five to thirty minutes until they are well risen and deep golden brown. They should sound hollow when tapped on the bottom. If needed bake for a few more minutes to reach your preferred crust color
- Transfer the baked bread bowls to a wire rack and let them cool completely. Cooling allows the crumb to set so the bowls stay strong when filled with hot soup
- To turn each loaf into a bowl use a small serrated knife to cut a circle from the top. Lift off the top and gently pull out some of the soft interior while leaving thick walls and a solid base. Save the extra bread pieces for dipping
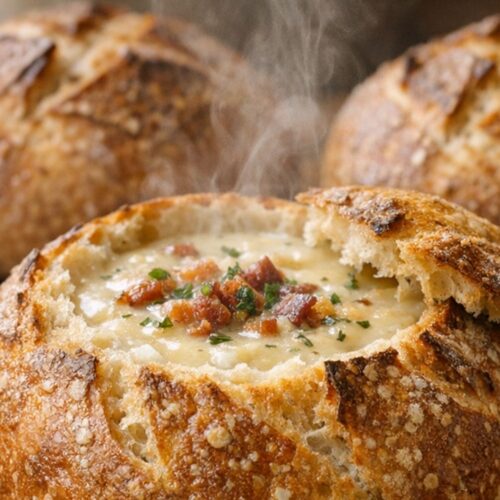
- Fill the sourdough bread bowls with hot soup such as broccoli cheddar soup creamy potato soup or tomato basil soup and serve right away
Notes
3. Ingredients for sourdough bread bowls with healthy substitutions
Below is a basic ingredient list for four medium sourdough bread bowls. The amounts are designed to give you a sturdy crust and a soft moist interior that can handle hot soup.
Main dough ingredients
• Strong bread flour about four cups which is close to five hundred grams
• Active bubbly sourdough starter at room temperature about one cup which is close to two hundred grams
• Warm water about two cups which is close to four hundred eighty milliliters
• Fine sea salt about two and a half teaspoons about twelve grams
• Optional honey or sugar about one tablespoon to gently balance the sour flavor
• Optional olive oil about one tablespoon for a softer crust and longer freshness
Healthy and plant based substitutions
• Flour choice
For extra fiber replace one cup of bread flour with whole wheat flour. This gives sourdough bread bowls a nutty flavor and darker color. If you want a lighter texture keep at least three quarters of the total flour as strong bread flour.
• Gluten free option
Traditional sourdough bread bowls rely on gluten to create structure. For a gluten free version use a high quality gluten free flour blend made for bread baking and look for one that contains psyllium husk or similar binder. Hydration can vary so start with slightly less water and add more slowly until the dough feels soft but not runny. The texture will be different yet still tasty.
• Plant based and dairy free choice
The base dough is naturally dairy free if you use olive oil instead of butter and do not brush the crust with egg wash. For a glossy vegan friendly crust you can brush the shaped bread bowls with a little plant based milk or olive oil before baking.
• Salt and sugar notes
Use sea salt or kosher style salt for a cleaner flavor. If you are watching sodium you can reduce the salt slightly but avoid cutting it by more than one third or the dough may taste flat. The small amount of honey or sugar is optional yet helps with browning and rounds out the tangy flavor.
Tips for choosing quality ingredients
Choose bread flour with moderate to high protein content so the dough becomes strong enough to stand tall in the oven. Your sourdough starter should smell pleasantly tangy not harsh or alcoholic and should double in size within several hours after feeding. Use filtered or non chlorinated water whenever possible since heavy chlorine can slow down natural fermentation. Simple high quality ingredients make a noticeable difference in the final taste and texture of your sourdough bread bowls.
4. Step by step method to prepare sourdough bread bowls
This method follows a relaxed schedule that fits into a normal day. Plan for an active starter and allow yourself enough time for rising and baking.
4.1 Preparing the sourdough starter
Feed your starter several hours before mixing the dough. For many home bakers this means feeding in the morning to mix the dough around midday or feeding in the evening to mix the dough late at night. The starter is ready when it has at least doubled in size looks airy and passes the simple float test in which a small spoonful gently placed in water stays at the surface.
4.2 Mixing the dough and initial rest
In a large mixing bowl add the warm water and active starter. Stir with your hand or a spoon until the starter is mostly dissolved. Add the bread flour and mix until no dry patches remain. The dough will look rough and shaggy at this stage which is normal. Cover the bowl with a clean cloth and let it rest for about thirty to forty minutes. This rest is often called an autolyse and helps the flour absorb water and begin gluten development.
After the rest sprinkle in the salt and the optional honey or sugar. If you are using olive oil add it now as well. Wet your hand lightly and pinch and fold the dough several times to distribute the salt and other ingredients. The dough will gradually become smoother and more cohesive.
4.3 Strengthening the dough
Instead of heavy kneading you can use gentle stretch and fold sets during the first couple of hours of bulk fermentation. Every thirty minutes perform a set of folds. Slide your hand under one side of the dough lift it up and fold it over itself. Turn the bowl slightly and repeat from all four sides. Each set takes less than a minute. After three or four sets the dough should feel stronger and more elastic.
4.4 Bulk fermentation
Cover the bowl again and let the dough continue to rise at room temperature. The total bulk fermentation time depends on room warmth and starter strength but usually ranges from three to five hours. The dough is ready when it has expanded by about fifty to seventy percent and shows a domed surface with small bubbles along the edges. It should feel airy yet still hold its shape when you gently tilt the bowl.
If your kitchen is cool the process may take longer. You can also slow bulk fermentation by placing the covered bowl in the refrigerator once the dough has gained some volume then letting it finish the next day. This extended cold rest deepens the flavor of sourdough bread bowls and can make the dough easier to handle.
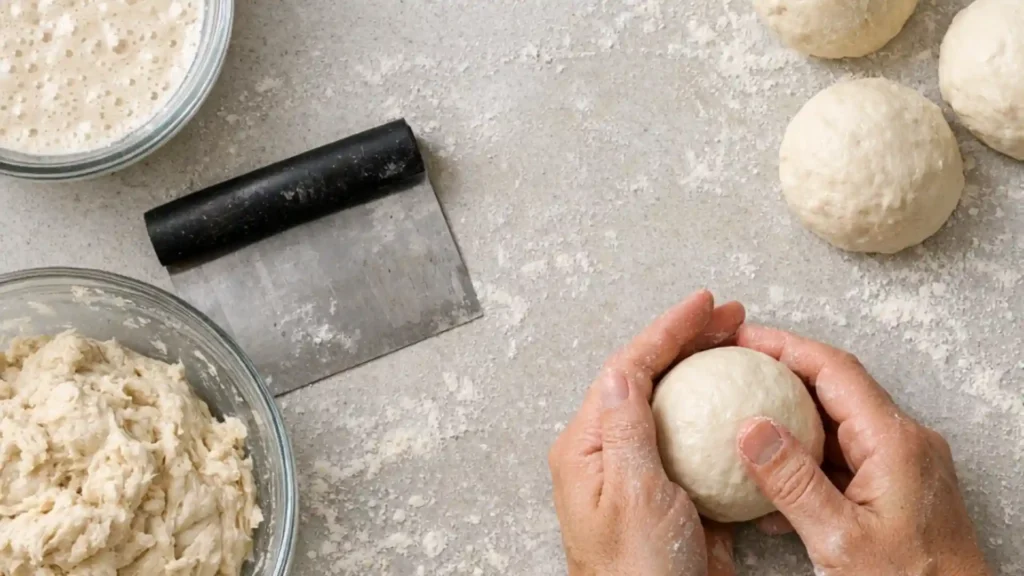
4.5 Dividing and pre shaping
Lightly flour your work surface and turn the dough out gently. Avoid tearing or pressing out all the gas. Use a bench scraper or a large knife to divide the dough into four equal portions. Try to handle each piece with care so you keep the internal structure.
For each portion use your hands to tuck the edges underneath creating a loose round ball. Let these rounds rest uncovered on the counter for about twenty minutes. This step is called pre shaping and allows the gluten to relax so final shaping becomes smoother.
4.6 Shaping the bread bowls
After the short rest lightly flour the surface again. Take one dough round and flip it so the smooth side is down. Gently stretch one edge toward the center then repeat from all directions to create surface tension. Finally flip the dough back over and use your hands to pull it toward you in small motions so the top becomes tight and smooth.
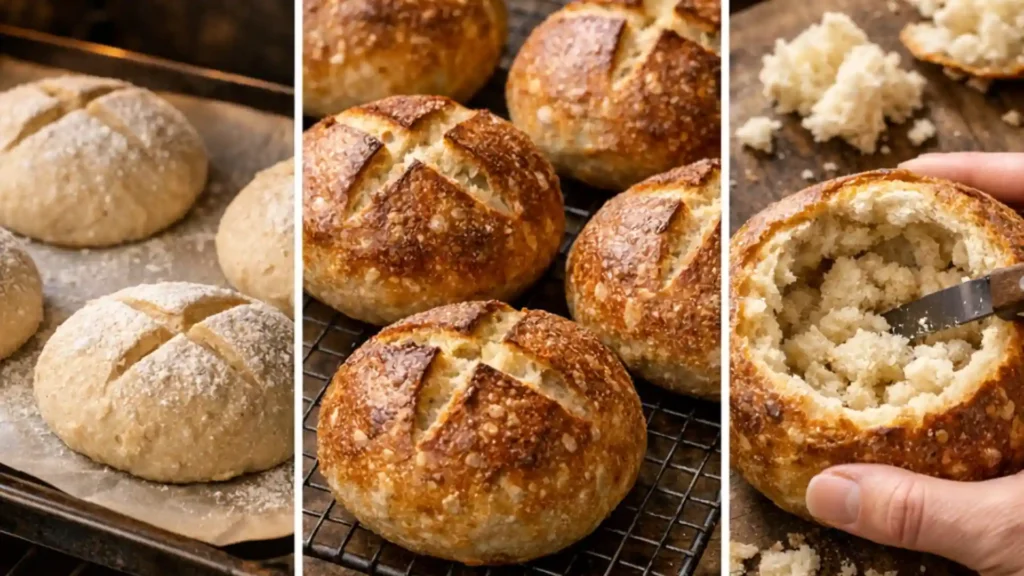
Repeat with the remaining pieces. Place each shaped round onto a parchment lined baking sheet or into small proofing baskets if you have them. Leave enough room between rounds since they will expand. Cover lightly with a cloth.
4.7 Final proof
Let the shaped bread bowls rise at room temperature until noticeably puffy. Depending on conditions this may take one to two hours. The dough should slowly spring back when you press a fingertip lightly into the surface. If the indentation disappears very quickly the dough needs more time. If it stays deeply and does not move at all the dough may be over proofed.
For even deeper flavor and easier scoring you can cover the shaped rounds and place them in the refrigerator for eight to twelve hours. Chilled dough goes directly into a hot oven and often gives a better crust and oven spring.
4.8 Preheating the oven
About thirty to forty minutes before baking heat your oven to a high temperature suitable for artisan bread. Aim for about two hundred thirty degrees Celsius which is close to four hundred fifty degrees Fahrenheit. If you use a baking stone or steel place it in the middle of the oven during preheating so it heats fully. You can also set a sturdy pan on a lower rack to create steam later by adding hot water.
4.9 Scoring and baking
Once the oven is hot uncover the dough. If you brushed the rounds with olive oil or plant based milk do that gently now. Use a sharp scoring blade or a very sharp knife to make shallow slashes across the tops of the dough. A simple cross pattern works well for sourdough bread bowls and helps them expand without bursting unevenly.
Place the baking sheet on the stone or middle rack. If you are using steam pour a cup of hot water into the preheated pan at the bottom of the oven and close the door quickly. Steam during the first part of baking keeps the crust supple and allows better oven spring.
Bake the sourdough bread bowls for about twenty five to thirty minutes. They should develop a deep golden brown color and sound hollow when tapped on the bottom. If you prefer a thicker darker crust leave them in for a few more minutes while watching closely. Transfer the baked bread bowls to a cooling rack and let them cool completely before filling. This helps the interior set and prevents soggy sides when you add soup.
4.10 Turning the loaves into bowls
When you are ready to serve use a small serrated knife to cut a circle from the top of each loaf. Lift off the lid and gently pull out some of the soft interior leaving enough thickness in the walls and base to hold liquid. Save the torn pieces for dipping into the soup. Fill each sourdough bread bowl with hot soup or stew and serve at once.
5. Tips and variations for sourdough bread bowls
Sourdough bread bowls invite creativity. With a few tweaks you can adjust flavor texture and nutritional profile to match different tastes and dietary needs.
Flavor variations
• Herb scented bowls
Add one to two teaspoons of dried herbs such as rosemary thyme or Italian style blends to the flour before mixing. Fresh chopped herbs can also be used in slightly larger amounts.
• Garlic and cheese bowls
Mix in a small handful of grated hard cheese and a teaspoon of garlic powder or roasted minced garlic during the first mixing stage. This variation pairs beautifully with tomato based soups and classic broccoli cheddar soup.
• Whole grain richness
Replace up to one third of the bread flour with whole wheat rye or spelt flour. This change adds depth of flavor and more fiber though it can make the crumb slightly denser.
Adaptations for different eating patterns
• Vegan friendly version
The main dough for sourdough bread bowls is already vegan as long as you skip butter and egg based washes. Brush the crust with olive oil or plant based milk to achieve a pleasant sheen. Pair the bowls with dairy free soups such as lentil vegetable stew or coconut based curries.
• Reduced sodium approach
If you need to limit salt you can gently reduce the salt amount while keeping at least half of the original quantity. Add herbs citrus zest or roasted garlic to increase perceived flavor without adding more salt.
• Higher protein option
Serve the bread bowls with protein rich fillings such as bean chili chicken soup tofu and vegetable stews or thick lentil soup. You can also replace a small portion of the flour with fine ground seeds such as sunflower or pumpkin to add some extra protein and healthy fats.
Serving ideas for a beautiful presentation
• For a cozy family dinner line up warm sourdough bread bowls on a large wooden board and fill them at the table. Garnish the soup with fresh herbs grated cheese or a swirl of cream.
• For parties or game days make smaller bowls by dividing the dough into six or eight pieces instead of four. These minis are perfect for thick cheese dips or hearty chili.
• Offer a soup bar with several options such as creamy broccoli cheddar potato leek soup and tomato basil. Guests can fill their own sourdough bread bowls and top them with grated cheese green onions or toasted seeds.
These small details turn simple sourdough bread bowls into a highlight of your gathering and encourage everyone to enjoy both the bread and the soup down to the last bite.
6. Approximate nutrition for each sourdough bread bowl
Exact nutrition values depend on flour type bowl size and any added ingredients. The numbers below assume one medium bread bowl made from white bread flour with a small amount of olive oil and no cheese baked to a golden crust.
Per one sourdough bread bowl
• Calories about three hundred fifty to four hundred
• Carbohydrates about seventy grams
• Protein about eleven to thirteen grams
• Total fat about three to five grams mainly from olive oil
• Fiber about three to four grams higher if you use some whole grain flour
• Sodium about five hundred to six hundred milligrams if you follow the standard salt level
Remember that the soup or stew you serve inside the bowl will add more calories and nutrients. Pairing sourdough bread bowls with vegetable rich soups and lean proteins can create a satisfying balanced meal.
7. Common problems and how to fix them
Even experienced bakers see occasional surprises when working with sourdough. Here are some frequent issues with sourdough bread bowls along with practical solutions.
Dense or heavy bread bowls
If the crumb feels tight and heavy rather than airy it usually means the dough did not rise enough or the starter was weak. Make sure your starter is very active before mixing the dough and allow enough time for bulk fermentation. The dough should gain noticeable volume and feel lively. Warmer environments help fermentation so consider placing the bowl in a slightly warm spot in your kitchen.
Bread bowls spreading out instead of rising tall
When bread bowls flatten on the baking sheet the dough may be too wet or the gluten may not be strong enough. Next time hold back a small amount of water during mixing and add only what you need to reach a soft but not sticky texture. Perform all the planned stretch and fold sets to build strength. A baking stone or steel also helps the dough spring upward by delivering intense bottom heat.
Crust too hard or too dark
A thick or overly dark crust can result from baking too long or at too high a temperature. Try reducing oven heat slightly near the end of baking or shortening the bake time by a few minutes. Another helpful trick is to cool the bread bowls on a rack but cover them loosely with a clean towel for the first fifteen minutes to soften the outer surface slightly.
Inside of the bowl turns soggy with soup
If the inner walls soak through quickly the loaf might not have baked fully or the crumb is too open in some spots. Make sure the bread bowls cool completely so steam escapes from the center. When hollowing the bowls leave a good layer of bread at the bottom and along the sides. For very thin or watery soups consider brushing the interior with a thin layer of melted butter or olive oil and letting it set before filling.
Sour flavor is too strong
Very tangy bread can occur if the dough ferments for a long time at warm room temperature. To keep the flavor milder shorten bulk fermentation or move part of the rise into the refrigerator. Using a young active starter that has recently peaked also produces a gentler tang.
8. Frequently asked questions about sourdough bread bowls
Q Can I replace bread flour with all purpose flour.
A It is possible to use all purpose flour but the dough may not hold its shape as well and the crumb can feel softer. If you only have all purpose flour reduce the water slightly and make sure to build strength with complete stretch and fold sets.
Q Can I prepare the dough the day before baking.
A Yes a long cold rest is one of the best ways to improve flavor and fit baking into a busy schedule. After bulk fermentation shape the bread bowls place them on a lined tray cover them and chill in the refrigerator for eight to twelve hours. Bake straight from the fridge the next day.
Q What is the best way to store baked sourdough bread bowls.
A Once fully cooled keep the bread bowls in a paper bag inside a loose plastic bag at room temperature for one to two days. For longer storage freeze them. Place the cooled bowls in freezer safe bags remove extra air and freeze for up to one month. Thaw at room temperature and refresh in a warm oven before serving.
Q Can I freeze filled sourdough bread bowls.
A It is better to freeze the bread and the soup separately. Freezing filled bowls can cause the bread to become soggy during thawing. Store extra soup in containers and freeze plain bread bowls so they stay crisp and pleasant when reheated.
Q How do I know when the bread bowls are fully baked.
A Look for a deep golden brown crust and a hollow sound when you tap the bottom of a cooled bowl. You can also gently break one open. The interior should be cooked through with no gummy spots. If the center looks underbaked place the remaining bowls back in the oven for several more minutes.
Q What soups go best with sourdough bread bowls.
A Thick creamy or chunky soups work especially well. Popular choices include broccoli cheddar soup loaded potato chowder tomato basil soup and hearty bean or meat based stews. Lighter broths can be served too as long as the bread bowls are baked until sturdy.
9. Conclusion and invitation to interact
Sourdough bread bowls bring the warmth of a bakery into your home and turn any soup into a complete memorable meal. With just flour water salt and an active starter you can create beautiful crusty loaves that double as edible serving dishes. This guide has walked you through each stage from building a strong dough and shaping round loaves to baking them until they are crisp outside and tender inside. Along the way you learned healthy substitutions flavor variations and practical fixes for common issues. 1
Now it is your turn to bring sourdough bread bowls to your own table. Choose a favorite soup perhaps a rich broccoli cheddar or a vegetable packed chili and plan a cozy evening menu. Once you try this method feel free to adjust sizes flavors and fillings to suit your family and guests.
If you bake these sourdough bread bowls share your experience in the comment section of your food blog or website. Mention what flour you used which soup you paired with the bowls and any tips that helped you succeed. Your feedback can guide other home cooks who are excited to try this comforting western style recipe. For more inspiration explore similar recipes on your site such as classic sourdough loaves crusty dinner rolls or creamy soup recipes that are perfect partners for these hearty bread bowls.
sourdough pretzels easy step by step guide